Porsche 356/912 Fuel Pump Overhaul
Instructions
Note: These instructions are for a reference/guide for overhauling the fuel pump installed on the 356C/SC and 912 models. They are intended for someone that has basic mechanical skills and tools to complete the job. Always take precautions when working with the fuel system, clean up fuel spills immediately, do not work on the fuel system when the engine is Hot, and check your work for leaks before operating the vehicle. Please completely read through these instructions before beginning work.
ACHTUNG!
Fuel soaked shop towels can spontaneously ignite,
place fuel soaked shop towels in approved
metal containers until they can be
cleaned or properly disposed.
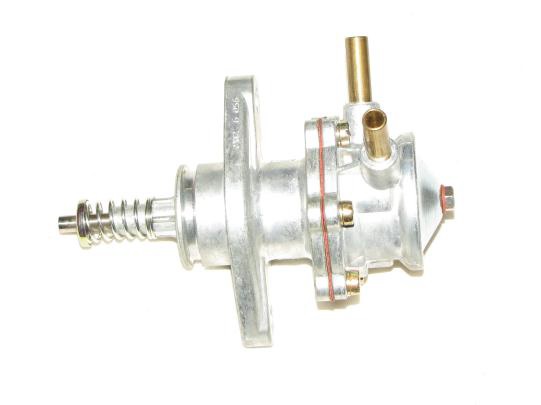
Step 1: Removing the Fuel Pump.
- Let the vehicle completely cool so that there is no chance of fuel hitting a hot exhaust manifold and igniting. Remove the fuel pump tin wear piece that is located directly below the fuel pump by removing the two tin wear screws. Disconnect and plug both the inlet and outlet fuel pipes. Remove the top
- and bottom 8/mm nuts and washers and then pull the fuel pump out of the engine crankcase.

Step 2; Dis-assembly
- Drain the fuel from the fuel pump, next note the orientation of the fuel inlet and outlet pipes. You will need this when it is time to re-assemble the pump.
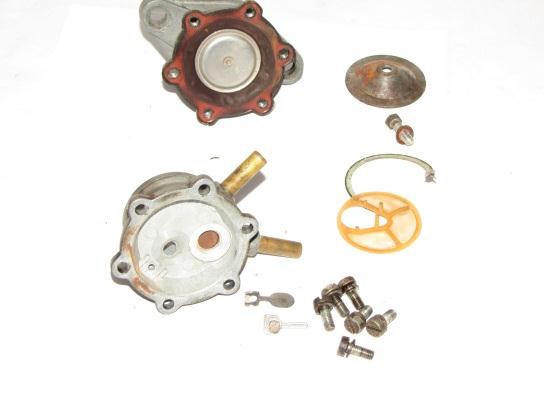
- Remove the 5m/m bolt in the top of the fuel pump and remove the cover and fuel filter screen.
- Now remove the 6 Flat head screws that surround the pump body and separate the top the pump. If you pump body over check valves, one is pump housing and lower halves of flip the top half of the you will see two pressed into the the other one is retained by a small flat head screw. Be careful not to damage either valve during the cleaning process.
- Next remove the pump diaphragm from the lower housing, this is done by compressing the pump spring on the front of the pump housing and then while holding the spring down slide out the retaining clip. Carefully release the spring tension and then slide the spring and cap off the end of the pump shaft. Pull the diaphragm and pump shaft assembly from the pump and remove the retaining pin from the shaft to separate the diaphragm from the shaft.
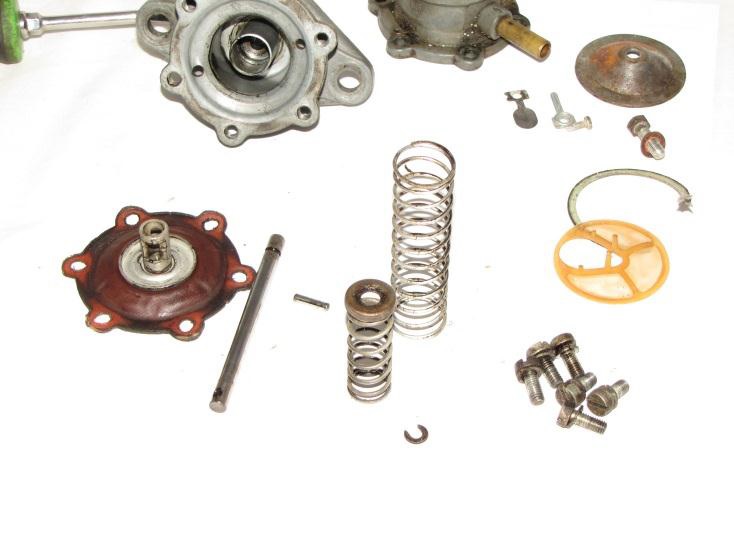
Step 3: Cleaning and Surface Prep
- Completely clean both housings as well as the top fuel filter plate. Take care around the check valves as damage to these parts will cause the pump not to work.
- You can clean the pump by using a parts washer or a media blaster using fine glass bead or baking soda.
- DO NOT BLAST THE CHECK VALVES.
- All of the gasket surfaces should be re-surfaced as over time they become warped we use our lathe to re-surface the pump but it can be done using 400 grit wet and dry sand paper on a flat surface.
- Be sure to re-clean all parts after the re-surfacing and blasting.
Step 4: Re-assembly
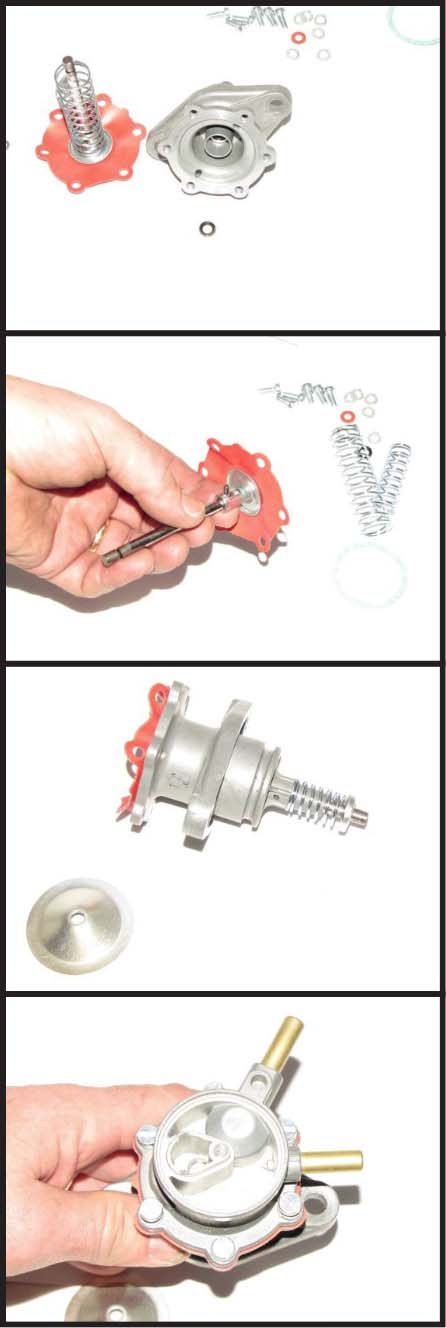 After cleaning and resurfacing lay out all of you parts on a clean flat surface. Open the fuel pump repair kit and lay out all of the parts. Assembly begins with the pump shaft seal, this is located in the lower part of the pump body and is pressed in and crimped at the factory.
- Check the seal if it is still soft and intact you may wish to continue using it as replacement is a little tricky. To replace the seal carefully pry the seal out being careful not to damage the housing. Before installing the new seal use a chamfer tool to chamfer the top of the hole where the factory has crimped the original seal. This will make it much easier to install the seal. Lubricate the new seal with silicone grease and carefully install the seal.
- Next assemble the original pump shaft to the new diaphragm by installing the retaining pin through the shaft. Place the new pump inner return spring, (the larger of the two), into the lower pump housing and then carefully slide the pump shaft and diaphragm assembly into the lower housing.
- Install the new outer pump return spring to the front of the lower pump housing, compress the spring and carefully install the spring retainer and clip. Set the lower housing to the side.
- Assemble the flapper valve back into the upper housing, if removed and make sure that both check valves are working correctly. Both valves should easily move and snap back against their seats when released. Assemble the new lock washers onto the new body screws supplied with the kit and then assembly the top and bottom housings together, being careful to correctly orientate the fuel intake and outlet pipes. When assembling the top and bottom housings apply some pressure to the pump shaft so that the diaphragm sits nicely on the lower housing and all of the bolt holes are aligned. Tighten all of the screws evenly and in a criss cross pattern.
The post Porsche 356 Fuel Pump Overhaul appeared first on Meister Werks • Renton Auto Repair • Renton Auto Service.
Please follow and like us: